Sous Vide Steak

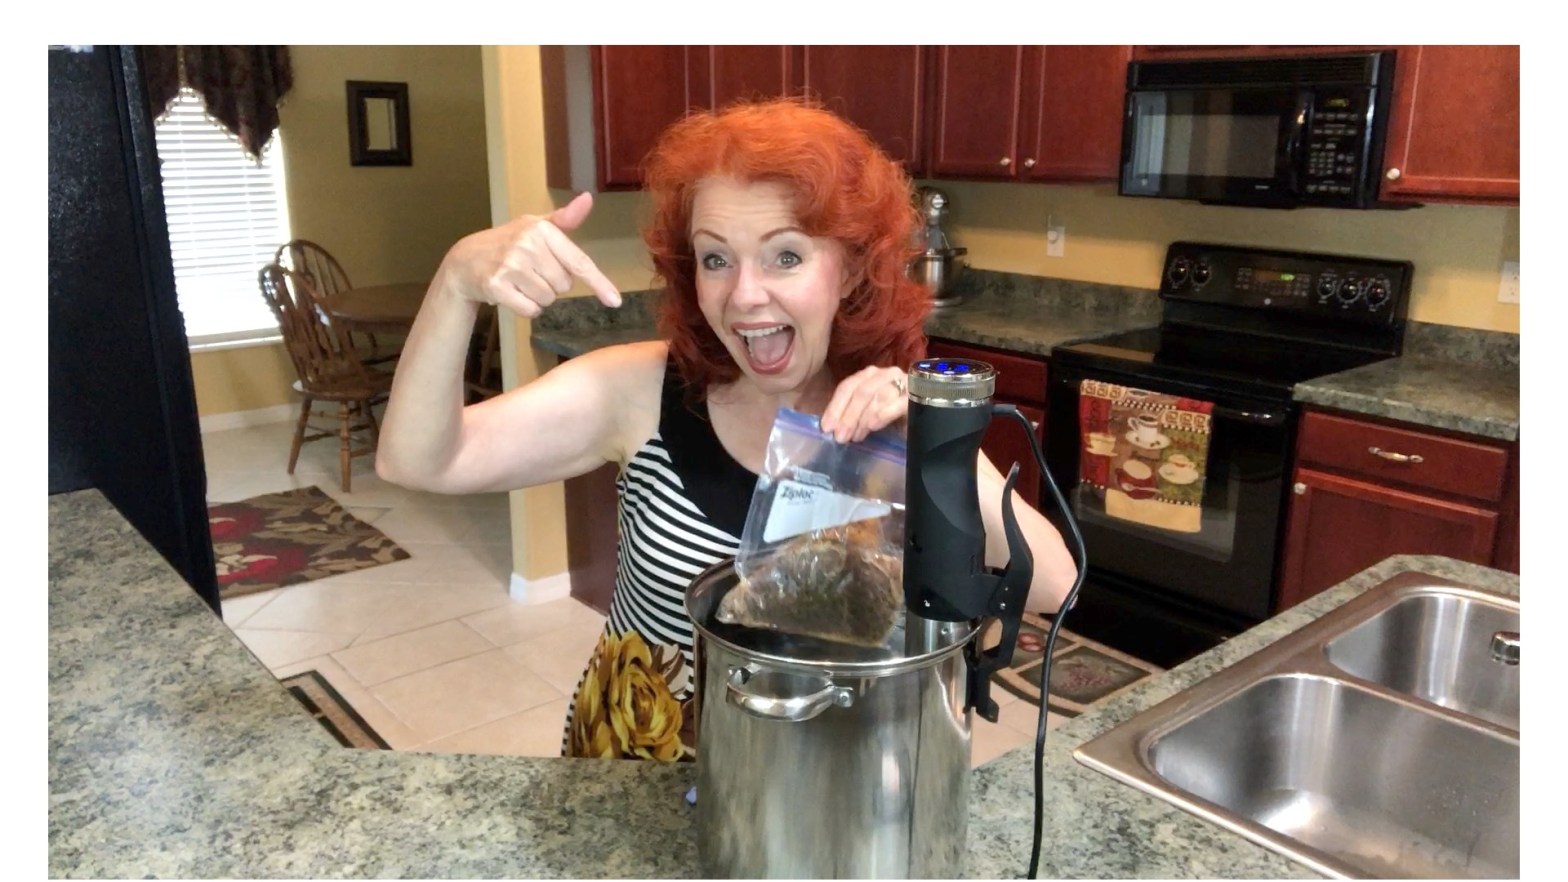
If you want a perfectly cooked steak, the Sous Vide method is definitely the way to go. I bought a Power Precision Cooker this summer and I have been so pleased with it. Recently, I bought steaks to take to my parents to celebrate their birthdays and used the Power Precision cooker. My parents and sister couldn’t get over how delicious the steaks were.  Watch my video to see just how easy it is to cook steaks Sous Vide style using the Power Precision Cooker.

If you’ve been wanting to try cooking using the Sous Vide method, I put a link down below where you can find the Power Precision Cooker at an affordable price.

Do you cook using the Sous Vide method? If so, I’d love to know what you’ve cooked. Please leave me a comment. I’d love to hear from you and I promise to respond. Thanks.

My Power Precision Cooker can be found here:

https://amzn.to/2II1IAw

SUPPORT:
Want to support me in creating more videos? Purchase your items by clicking on the link for the Power Precision Cooker above and I’ll receive a small percentage of the final sale. Thank you!

——-DISCLAIMER——-

This video and/or description contain affiliate links. These links have the potential to earn me a small commission which is what helps to keep the channel running and helps me have the opportunity to continue making videos such as this one. Thank you so much for your support.

How to Make Egg Salad

If you like Egg Salad you will love this recipe and the quick and easy tips I share on my video. Watch to see how to make this simple recipe that tastes amazing.

Recipe:

10 hard boiled eggs (I cooked mine in the instant pot using the egg steam rack)
2.5 tbsp Sweet Relish
1.5 tbsp Dill Relish
2.5 to 3 tbsp of Mayonnaise
1 tbsp of yellow Mustard
1 tbsp of chopped onion
Light sprinkle of Pink Salt or salt of your choice
Sprinkle of Black Pepper
Onion Powder to taste
Garlic Powder to taste
Paprika

I mix all the ingredients together and then add the eggs. You can do it however you wish. If you aren’t sure how you think it will taste, put the chopped eggs in first and add the mixture of everything else a little at the time until you get the desired taste. You might want to add even more sweet or dill relish than what this recipe calls for. Chill for at least an hour before serving. Enjoy!

What do you put in your egg salad? I look forward to hearing from you.

You can find my Ninja here:
http://amzn.to/2C832dn

You can find my instant pot here:
http://amzn.to/2h1j4Az

You can find my Egg Steam Rack here:
https://amzn.to/2M42Tjv

Light Kit: http://amzn.to/2DcvdJq
Light bulbs: https://amzn.to/2EO2ZEh
——-DISCLAIMER——-
This video and/or description contain affiliate links. These links have the potential to earn me a small commission which is what helps to keep the channel running and helps me have the opportunity to continue making videos such as this one. Thank you so much for your support.

You can email me at thegingeroptimist@gmail.com

Air Fryer Fried Chicken

My darling husband bought me an Air Fryer. I wasn’t sure if I would really like it or not but thought it was definitely worth trying. Can I just say that I love it! I am amazed at how easy and how awesome fried chicken is in the Air Fryer. This recipe is gluten free so not only does the chicken taste great, but it’s good for those who have low to no tolerance for gluten.

You can watch the video below to see my step by step instructions.

Do you have an Air Fryer? If you do, please leave me a comment about what you have cooked in yours. I would love to connect with you. Thanks!

You can find my Air Fryer here:

https://amzn.to/2LJLb4F

SUPPORT:
Want to support me in creating more videos? Purchase your items by clicking on the links below and I’ll receive a small percentage of the final sale. Thank you!

——-DISCLAIMER——-

This video and/or description contain affiliate links. These links have the potential to earn me a small commission which is what helps to keep the channel running and helps me have the opportunity to continue making videos such as this one. Thank you so much for your support.

Best Burger I’ve Ever Made

OMGoodness! I am so excited about my new kitchen tool. I got a Power Precision Cooker which enables me to cook Sous Vide style. I told my friend Alex that if I ever found one for $50 I would definitely buy it. Alex bought a Sous Vide about a year ago and has been one my guests on my YouTube channel. You can see her on the video: Instant Pot Cheesecake vs Sous Vide Cheesecake.

A few weeks ago I was on vacation in Cincinnati and found the Power Precision Cooker on sale for $50. I was so excited to get it and give it a try. I can honestly say I am not disappointed at all. In fact, I love it!

You might ask, “What is Sous Vide?” Sous Vide is a cooking method that began in high end kitchens and restaurants and now has been made affordable for just about anyone. It is a way of cooking your food to precisely the temperature you want it to be every single time. You cook your food in BPA free freezer bags, or food sealed with a Food Saver, or glass bake ware in a gentle water bath. This means the food is submerged in water that is constantly maintained at at certain temperature. Your meat comes out tender and juicy. If you want your burger rare, you set the temp and time for rare. If you want your burger well done, you set the time and temp for well done, etc. I recommend that you sear your meat when it is finished cooking in a little butter in a pan on your stove top. It gives it that beautiful “finished” look.

Watch my video for step by step instructions for cooking a Sous Vide burger. I’ll put a link below where you can purchase a Power Precision Cooker if you are interested.

Do you cook Sous Vide? Please leave me comments down below. I would love to know what you have cooked using this method. I’m looking forward to cooking steaks with this method soon.

Happy cooking!

You can find the Power Precision Cooker here:  https://amzn.to/2II1IAw

——-DISCLAIMER——-

This video and/or description contain affiliate links. These links have the potential to earn me a small commission which is what helps to keep the channel running and helps me have the opportunity to continue making videos such as this one. Thank you so much for your support.

How to Make No Mess, No Fuss Fried Fish

Love fried foods but don’t like the mess or the fact that fried foods aren’t good for you? Welcome to my world. If you haven’t already tried an Air Fryer, allow me to introduce you to one.

I had a friend come over the other day and she brought her Air Fryer. I’d heard of Air Fryers but never used one or eaten food that was cooked in one until now. Boy is it ever a game changer for those who love fried foods. Watch my video down below to see how quick and easy it is to cook in an Air Fryer. Spoiler alert: the fish was amazing!

I was so amazed at how easy the Air Fryer is to use. Even an eight year old could use it (with supervision of course). Do you use an Air Fryer? If so, what is your favorite thing to cook in it? Feel free to leave comments down below.

The link below is the Air Fryer we used on this video:

https://amzn.to/2yFMTyG

——-DISCLAIMER——-

This video and/or description contain affiliate links. These links have the potential to earn me a small commission which is what helps to keep my blog and YouTube channel running and helps me have the opportunity to continue making videos such as this one. Thank you so much for your support.

How to Make Sofrito

Sofrito is a fresh seasoning used in most Puerto Rican dishes. It can be added to rice, pork roast, stew, spaghetti sauce and many other recipes. There are different recipes for making Sofrito. This recipe is from my Puerto Rican friend, Margarita. It smells so good and adds great flavor to your food. You can add tomato sauce if you like.

Watch the video below to see how to make Sofrito and how to freeze it.


Sofrito:

Six bell peppers
3 yellow onions
1 large bunch of cilantro
4 heads of garlic

Wash and prep all your veggies.

Pull garlic cloves apart and soak garlic cloves in cool water.
After soaking, cut off the end of each clove and it will peel easily.

Cut up stemmed & seeded bell peppers.
Put a portion of each veggie in your blender and blend until smooth. You can keep adding more veggies and blend until your blender is almost full.
Pour into a large bowl.
Continue the process until all your veggies are blended.
Mix well in bowl.
You can add a little salt if you like.
You can add other veggies if you wish.
You can find many different recipes for Sofrito.

Place in ice cube trays and or small freezer containers and freeze. When the ice cube trays are frozen you can run a little warm water over the bottom of your trays and the frozen Sofrito cubes will pop right out. Put them in a freezer bag and use 1 or 2 Sofrito cubes as needed.Each cube is about 1 tablespoon. In most recipes 2 cubes will be just about right. You don’t even have to defrost your cubes before using. If you use a small freezer container you can pull it out and keep in your refrigerator and use it daily in your cooking up to 1 week.

Enjoy!

Instant Pot Cheesecake Vs. Sous Vide Cheesecake

Oh my goodness! If you want some amazing cheesecake this is it! Whether you make it in your instant pot or you use the sous vide method, it is awesome. The down side of this cheesecake is that it is addicting. The last one I made I had to give a portion of it away so that we wouldn’t eat the whole thing. The friends we gave the cheesecake to were more than happy to help us out.

You can watch the video below to see step by step instructions on how to make the cheesecake in the instant pot and with the sous vide.

Cheese Cake in the Instant Pot & Sous Vide

Start by making the crust. Crush one full pack of graham crackers (approximately 9 whole crackers) in your Ninja or you can put the crackers in a zip lock bag and crush them with a roller.
Add 4 tbsp of melted butter, a pinch of salt, 2 tsp of brown sugar.
Mix ingredients together.
Cover the bottom of your spring form pan with parchment paper and the sides with butter.
Now put the crust mixture in the bottom of your pan and spread out. Use the bottom of a glass to mash the mixture down and spread evenly. Put the crust in the freezer while you make your cheesecake batter.

Now make the cheesecake batter.
Add:
2/3 cup of sugar
2 tbsp of cornstarch
½ tsp of salt
*16 oz of cream cheese
*½ cup of sour cream
*2 eggs
2 tsp of vanilla extract
6 to 8 drops of pure lime essential oil (make sure it is food grade essential oil)
Mix all the above ingredients together on low setting.

*Make sure your butter, cream cheese, eggs, and sour cream are at room temperature before making batter.

Now pour the batter onto the crust and spread evenly.

Put in the instant pot on top of the trivet. Cook on manual for 26 minutes and allow it to self release for 10 minutes.

*Mix 2 heaping tbsp of sour cream with 2 tsp of sugar and spread on top of cheesecake. This is optional.

Put in the refrigerator for 4 hours. After 4 hours put the spring form pan on a big jar and release the spring form.

Berry Compote

16 oz. frozen mixed berries
zest of two limes
juice of one lime
3-4 tbs. granulated sugar

Put frozen berries in a medium saucepan over medium-high heat. Add the zest, juice and sugar, bring to a boil, stirring occasionally. Reduce to a simmer and allow to cook until sauce is thickened enough that it coats the back of a spoon. Allow to cool, and serve.

Use the same cheesecake recipe for making sous vide cheese cake. Allow it to cook for 90 minutes and remove jars and allow them to cool for 15 to 20 minutes and then refrigerate for 4 hours.

The Instant Pot I used in the video can be found here:
http://amzn.to/2h1j4Az

You can find my Ninja here:
http://amzn.to/2C832dn

You can find my kitchen aid mixer here:
http://amzn.to/2hFze2M

Sous Vide:
https://amzn.to/2L7QcQu

SUPPORT:
Want to support me in creating more videos? Purchase your items by clicking on the links above and I’ll receive a small percentage of the final sale. Thank you!

Rotisserie Chicken in the Instant Pot

For a quick delicious dinner I love rotisserie chicken. For years, I would stop by Sam’s Club and pick one up. That is definitely a super quick dinner when you add a few veggies.

However, recently I picked up an organic chicken on sale at Earth Fare and decided to try to make a rotisserie chicken in my instant pot. It turned out great. It wasn’t hard to do and best of all, I knew it was organic and had no preservatives.

I added baked sweet potatoes and some some steamed veggies and we thoroughly enjoyed our dinner. Since it’s just the two of us we always have quite a bit of left over chicken.

One of my favorite things to do with the left over chicken is to de-bone it and make chicken sandwiches. I try not to eat a lot of bread so I use romaine lettuce leaves in place of bread. Just add a little mustard, pickles, avocado and chicken and voila, you have an amazing sandwich!

You can watch my video below to see how I made the rotisserie chicken in my instant pot. By the way, my instant pot is one of my best friends in the kitchen.

Rotisserie Chicken Recipe:

1 whole chicken (washed & patted dry)

Put olive oil over the entire chicken (inside skin too)

Put seasonings on chicken (and in the cavity)

Seasonings I use:

Black Pepper, Pink Himalayan Salt, Italian seasoning, Paprika, Herbs de Provence, Garlic Powder, & Poultry Seasoning. You can put as much or as little as you like of each seasoning. You can also add your own seasonings.

Sear the chicken in the instant pot for 5 minutes per side on Saute mode.

Pull chicken out and place on the trivet on a large plate.

Put cut up celery stalks (from 2 stalks) and 1/3 stick of butter inside the cavity of chicken.

Put chicken in the instant pot on the trivet and add a cup of organic chicken broth. Cook on manual for five to six minutes per pound. My chicken was 5 lbs. 12 oz. It was falling apart when I took it out after cooking for 35 minutes.

Wait for the natural release. Will be approximately 15 to 18 minutes.

Enjoy!

What have you been cooking in your instant pot? Please leave me comments down below.

You can get an instant pot here:

https://amzn.to/2kDGuKo

——-DISCLAIMER——-

This video and/or description contain affiliate links. These links have the potential to earn me a small commission which is what helps to keep the channel and blog running and helps me have the opportunity to continue making videos such as this one. Thank you so much for your support.

How to Make Non-fishy Tasting Salmon & Sweet Potato Fries

I absolutely love my salmon but I don’t care for fishy smelling or fishy tasting fish. Years ago, a friend shared with me her secret to cooking salmon and it tastes amazing and doesn’t have a fishy taste. It turns out great every time I cook it.

In the video below, you can see exactly how I cook my salmon and sweet potato fries. The sweet potato fries taste yummy and they are so good for you. You can spray olive oil cooking spray on the fries or mix the fries with a little olive oil and seasoning in a gallon size zip lock bag. Then place them on a parchment paper lined baking sheet. Hope you enjoy the video.

Non-Fishy Tasting Salmon Every Time:

Slice your salmon into 1/2 inch layers, then rinse and pat dry

Spray salmon with Olive Oil cooking spray

Sprinkle salmon with Applewood Rub & squeeze fresh lemon juice onto fish

Turn fish over and spray with olive oil, sprinkle with Applewood Rub, and squeeze lemon juice on top.

Place fish in a frying pan over medium heat. Put lid on with a slight tilt in order for air to flow.

Set timer for 4 minutes.

When timer goes off, flip the fish, squeeze more lemon juice on fish and then put lid back on with a slight tilt. Set timer for 3 minutes.

Sweet Potato Fries:

Wash potatoes and peel.

Slice potatoes into thin strips.

Spray with olive oil spray on your baking pan.

Spray fries and then sprinkle on salt & pepper. You can use Herbamare or your favorite seasoning instead if you like.

Bake in oven at 400 degrees for 15 to 20 minutes depending on how you like your fries. If you want them extra crispy, at the end turn the oven on broil and let them sit for about a minute but keep a close eye on them. Enjoy!

My Beef Stew in the Instant Pot

Nothing like hearty beef stew when you are hungry. I love the flavor of beef with potatoes, carrots and onions.

It’s so easy to make beef stew in the instant pot. You can watch my video below to see exactly how I make it.


My Beef Stew in the Instant Pot Recipe:

1 ½ lbs of beef stew meat (lightly salt & pepper the meat)

2 tbsp of Grapeseed oil

2 ½ cups of beef broth

2 dashes of Worcestershire sauce

1 can of Cream of Mushroom Soup

4 carrots peeled & sliced

4 large potatoes cut into cubes

1 package of frozen sweet green peas

Turn your instant pot on saute and add 2 tbsp of grapeseed oil. When your instant pot reads hot add your beef stew meat and sear on all sides. Remove meat and pour out the oil. Turn the pot off and back on to manual for 35 minutes.

Pour the beef broth, a couple of dashes or Worcestershire sauce, and Cream of Mushroom soup into the pot. Stir.

Now add the meat and vegetables. Put the lid on and make sure your valve is on seal. Allow the pot to come to pressure and cook for 35 minutes. Then allow your stew to self release. (In other words, don’t use the quick release.) It took my instant pot 37 minutes to totally release. You could probably self release at 30 minutes if you need to.

Check the stew to see if it needs more salt before you serve it. Also, you can add a little ketchup to it if you like.

Enjoy!